Android: Using GPS and Google Map
This is a step-by-step guide for beginners to follow and learn about Androids and Google Maps.
Creating the Project
Using Eclipse, create a new Android project.
To use GPS functionality in your Android application, you'll need to add the ACCESS_FINE_LOCATION permission to the AndroidManifest.xml file:
<?xml version="1.0" encoding="utf-8"?>
I have a sample code of "HelloWorld" for Google Maps here. But remember to replace the Maps API key by following the steps below.
Register for Google Maps API key
To register for the keys, go http://code.google.com/android/maps-api-signup.html.
Get your Certificate fingerprint (MD5) by entering the following code (for windows) in command prompt. Remember to replace "<your-user-name>" with your windows username.
Note: If you get "keytool is not recognized as an internal..." error, add "C:\Program Files\Java\jre6\bin" to Path in System environment.
Keep your MD5 code, you will need it every time you create a new project.
Add the following code in your main.xml file in /res/layout/.
Same rule apply, replace "<your-api-key>" with the new key you have generated.
To Test GPS Functionalities in Android Emulator
There are 2 main ways to test your GPS functionality in an emulator.
1. DDMS, Android plug-in for Eclipse.
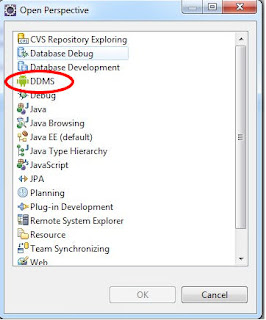
To turn on DDMS, in Eclipse menu bar, select "Windows > Open Perspective > Other..". You will see the screenshot shown.
Select "DDMS" with the Android icon beside it. You will notice your IDE layout changed as soon as you click it.
In the lower left corner, theres a "Emulator Control box".
In the box, scroll down to enter "Location Controls" (coordinates), or you can upload .GPX or .KML files. A sample of .GPX file can be obtained here.
Alternatively...
2. Telnet to Android Emulator
You can telnet to Android Emulator to manually feed in the geo coordinateness via command prompt.
Hope this helps some of you out there to get a quick start on Google Android maps.
Creating the Project
Using Eclipse, create a new Android project.
To use GPS functionality in your Android application, you'll need to add the ACCESS_FINE_LOCATION permission to the AndroidManifest.xml file:
<?xml version="1.0" encoding="utf-8"?>
<manifest xmlns:android="http://schemas.android.com/apk/res/android"
      package="com.coalition"
      android:versionCode="1"
      android:versionName="1.0">
    <application android:icon="@drawable/icon" android:label="@string/app_name">
        <activity android:name=".CoalitionActivity"
                  android:label="@string/app_name">
            <intent-filter>
                <action android:name="android.intent.action.MAIN" />
                <category android:name="android.intent.category.LAUNCHER" />
            </intent-filter>
        </activity>

    </application>
    <uses-sdk android:minSdkVersion="6" />

<uses-permission android:name="android.permission.ACCESS_FINE_LOCATION"></uses-permission>
</manifest>
I have a sample code of "HelloWorld" for Google Maps here. But remember to replace the Maps API key by following the steps below.
Register for Google Maps API key
To register for the keys, go http://code.google.com/android/maps-api-signup.html.
Get your Certificate fingerprint (MD5) by entering the following code (for windows) in command prompt. Remember to replace "<your-user-name>" with your windows username.
$ keytool -list -keystore C:/Users/<your-user-name>/.android/debug.keystore
Note: If you get "keytool is not recognized as an internal..." error, add "C:\Program Files\Java\jre6\bin" to Path in System environment.
Keep your MD5 code, you will need it every time you create a new project.
Add the following code in your main.xml file in /res/layout/.
<com.google.android.maps.MapView
    android:id="@+id/mapview1"
    android:layout_width="fill_parent"
    android:layout_height="fill_parent"
    android:clickable="true"
    android:apiKey="<your-api-key>" />
Same rule apply, replace "<your-api-key>" with the new key you have generated.
To Test GPS Functionalities in Android Emulator
There are 2 main ways to test your GPS functionality in an emulator.
1. DDMS, Android plug-in for Eclipse.

To turn on DDMS, in Eclipse menu bar, select "Windows > Open Perspective > Other..". You will see the screenshot shown.
Select "DDMS" with the Android icon beside it. You will notice your IDE layout changed as soon as you click it.
In the lower left corner, theres a "Emulator Control box".
In the box, scroll down to enter "Location Controls" (coordinates), or you can upload .GPX or .KML files. A sample of .GPX file can be obtained here.
Alternatively...
2. Telnet to Android Emulator
You can telnet to Android Emulator to manually feed in the geo coordinateness via command prompt.
C:\>telnet localhost 5554
Android Console: type 'help' for a list of commands
OK
geo fix -82.411629 28.054553
OK
Hope this helps some of you out there to get a quick start on Google Android maps.

Hi Bing,
ReplyDeleteThanks for this very nice tutorial.
I tried loading some of the gpx files in emulator but could not succeed. May be compatibilty issues.
Can you please attach a compatible gpx file which will work.
Thanks,
Vaibhav.